BPO Start guide
In the following, a start guide of the BPO module is described in detail.
BPO Task Specification
To begin with, it is need to set up the required input of the BPO module, called task specification. The user creates the task specification on the HMI web interface and then, the HMI sends the task specification to the BPO module through the OCB.
How to Set Up a Task Specification
Here is an example of the task specification. At the moment, we address a single robot-human-item problem. Multiple robots-humans-items problem could be available in the following version of the BPO module.
BPOSpecificationInput.json
{
   "Environment":{
    "locations":{
        "Name":["Warehouse","Injection_machines","Packing_machines","Starting_point_1","Charging_area","anywhere","on_robot_1"],
        "Letter":["A","B","C","D","F","*","R"]
        },
    "robot_1":["A","B","C","D","F"],
    "human_1":["A","B","C","D"],
    "item_1":["A","B","C", "D", "R"]
    },
   "Constraints":{
    "robot_1":{
        "A":["*"],
        "B":["A","C","D"],
        "C":["A","B","D"],
        "D":["A","C","B"],
        "F":["A"]
        },
    "human_1":{
        "A":["B","C","D"],
        "B":"A",
        "C":["A","B"],
        "D":["A","C"]
        },
    "item_1":{
        "A":"R",
        "B":"R",
        "C":"R",
        "D":"R",
        "R":["A","B","C","D"]
        }
    },
   "Starting_point":{
    "robot_1":"F",
    "human_1":"D",
    "item_1":"A"
    },
   "Objective":{
    "item_1":"D"
    }
}
"locations": "Name" defines the locations in the floor that the robots, humans and items could be. The names should be the same as the ones used in the annotation file as processed by the Central SP (see the relevant installation guide of Central SP). "anywhere" determines all the defined locations that an agent (robot, human, item) could navigate. The robot agent could transport from location "A" to "B", "C", "D", "F". "on_robot_1" defines the "loading" status when the robot is carrying an item. For the example above, the item can be loaded on the robot (notated as "R") from locations "A", "B", "C"
"A":"R", "B":"R", "C":"R"
and could be "unloaded" from robot to "A", "B", "C".
"R":["A","B","C"]
Do not omit the "loading" or "unloading" status transitions, since the item could not be loaded or unloaded from/on the robot. Otherwise, the planner will not be able to find the solution to the given task.
"locations": "Letter" is to set a unique alphabet letter for each predefined location respectively. For the example above, "Warehouse" is notated with "A", "anywhere" is notated with "*" and "on_robot_1" is notated with "R". Using the "Letter" notations, define the location that an agent is possible to move. For example, the robot agent could be at "Warehouse", "Injection_machines", "Packing_machines", "Starting_point_1", "Charging_area". An item could be at "Warehouse", "Injection_machines", "Packing_machines", "on_robot_1". Do not forget to include the letter notation for the robot in order to determine that the item is loading on the robot.
"Constraints" enable all the possible transitions from a location to another. For example, the robot agent could transport from location "A" to "B", "C", "D", "F" or the item can be loaded on the robot (notated as "R") from locations "A", "B", "C".
"Starting_point" is the current location of each agent. For example, robot is at "Charging_area", human is at "Starting_point_1" and item is at "Warehouse" (notated as "A").
Since we have set up the environment, we can now determine the task that BPO is going to solve. The task is the determimnation of the task sequence to the desired location that we would like to transport the item defined in "Objective". For example,
"item_1":"D"
determines that we would like the item to be transported from location "A" (current location extracted from the "Starting_point") to location "D" ("Starting_point_1").
Send a Task Specification from HMI to BPO
Open another tab on the web browser and go to http://<IP or localhost>/main. Use admin both as username and password to log in to the HMI app. Then, click on the BPO tab and create a task specification in the window according to the example above.
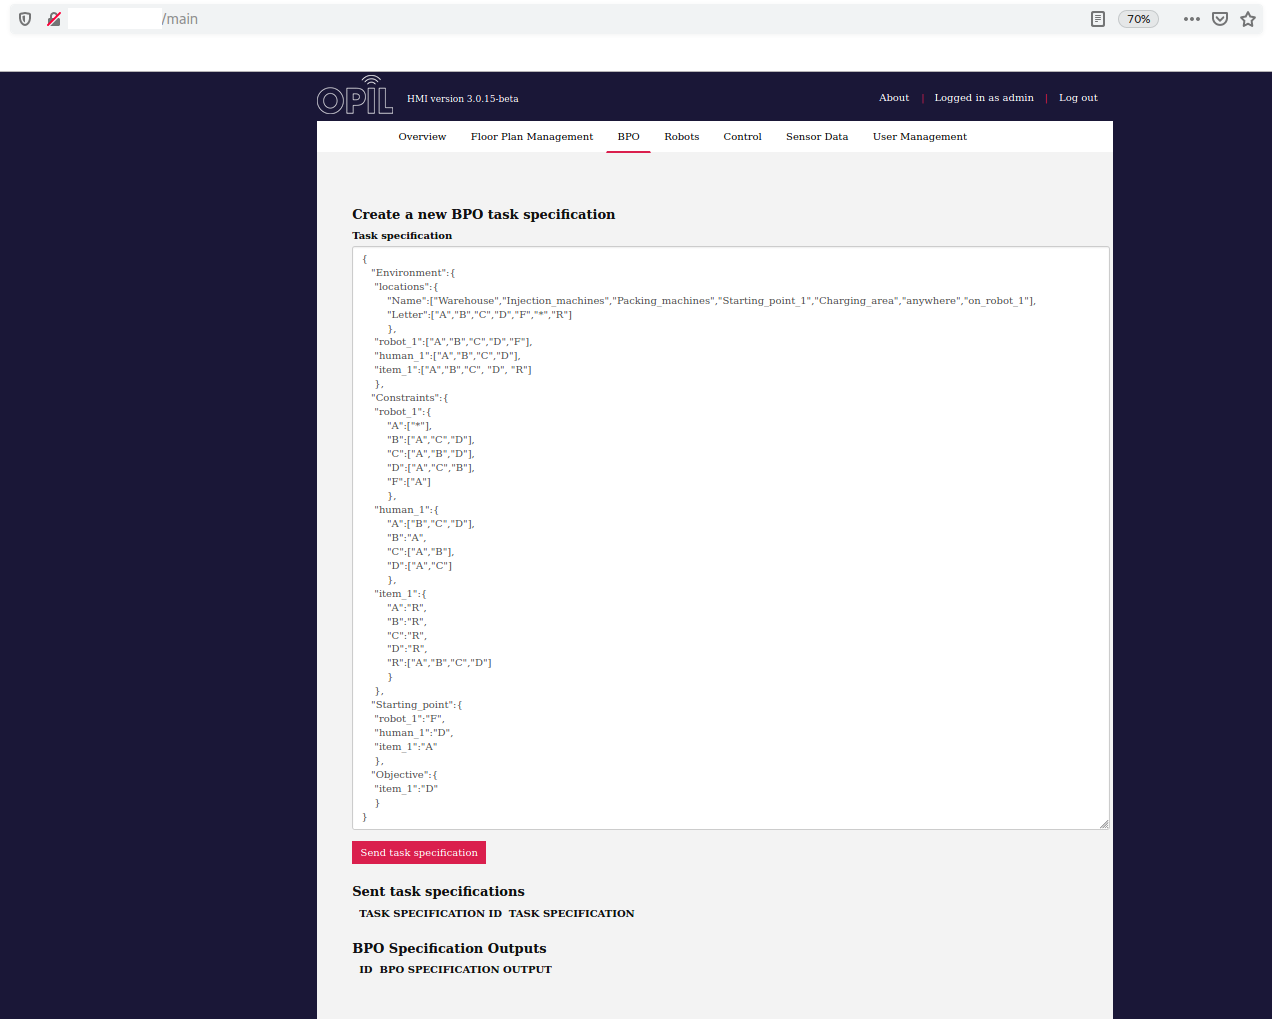
Then, click the red button of "Send task specification" existing under the window to assign the task specification to the BPO module.
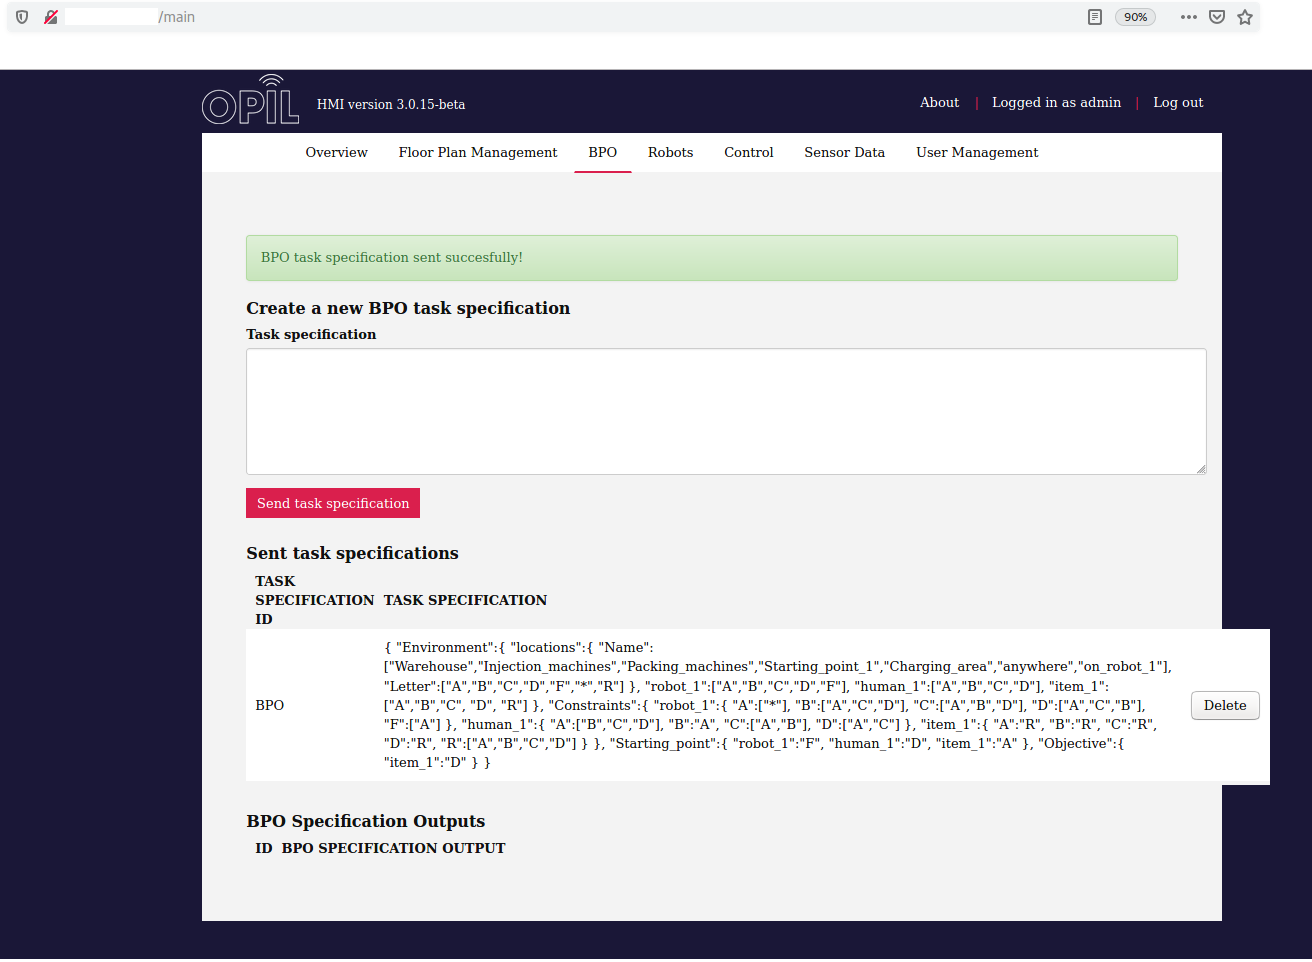
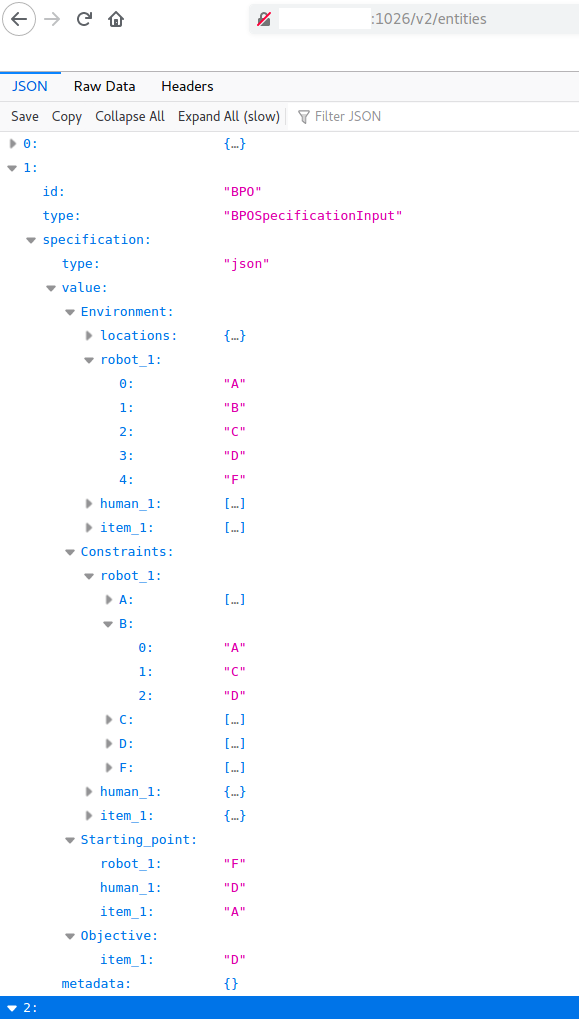
You can also check that the BPOSpecificationInput entity has been added on orion entities (http://<ocb_IP>:1026/v2/entities) containing the task specification sent from the HMI.
15 seconds later, the solution provided by the BPO is visible in the BPO Specification Outputs section of the BPO tab on the HMI.
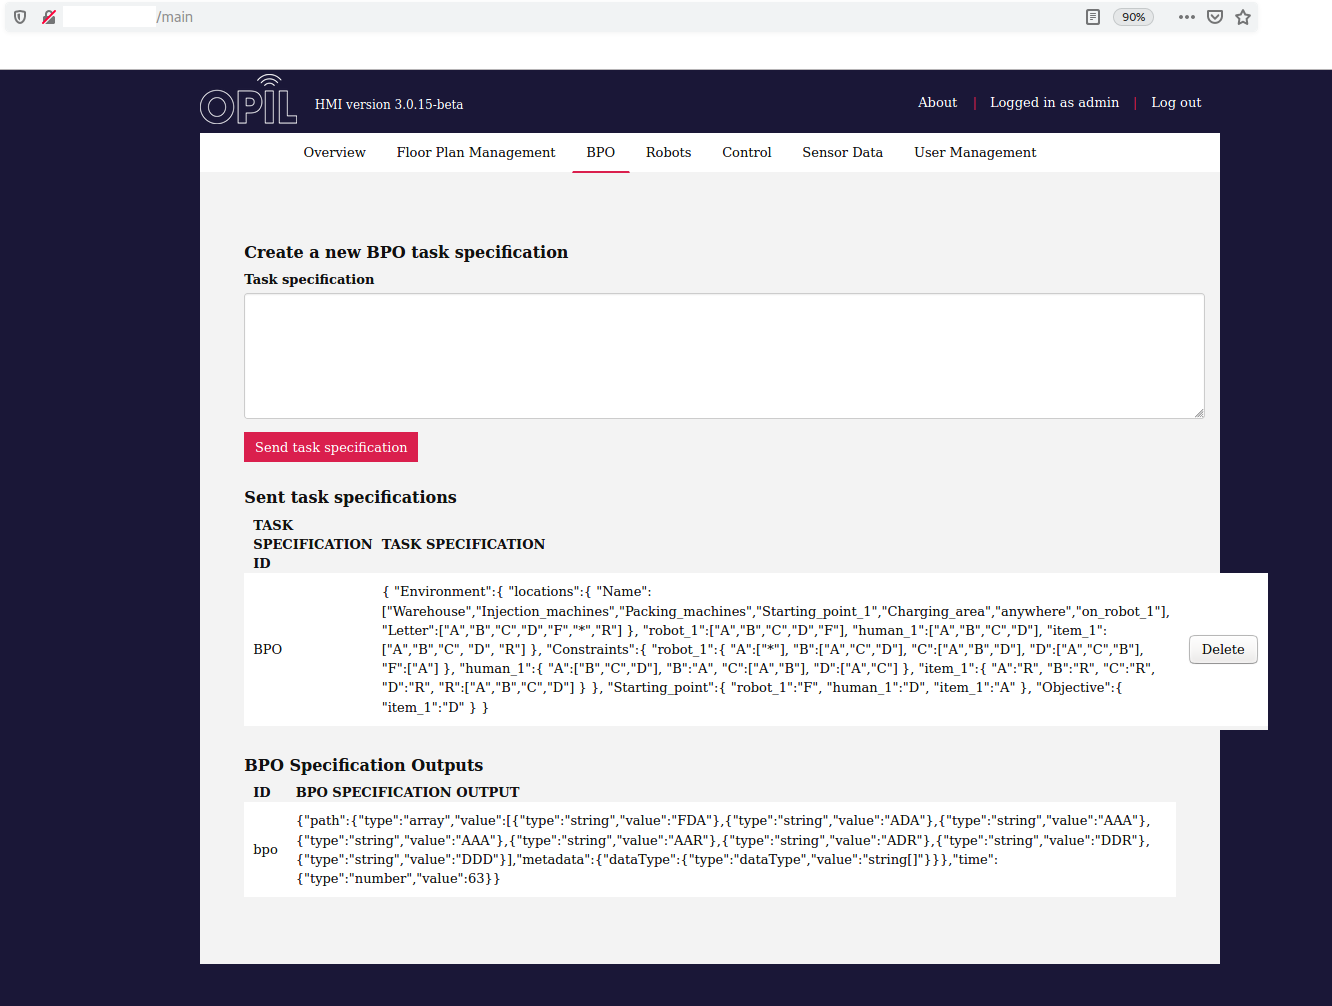
Moreover, you can check the orion entities (http://<ocb_IP>:1026/v2/entities) that the opil_bpo.Results entity is now added.
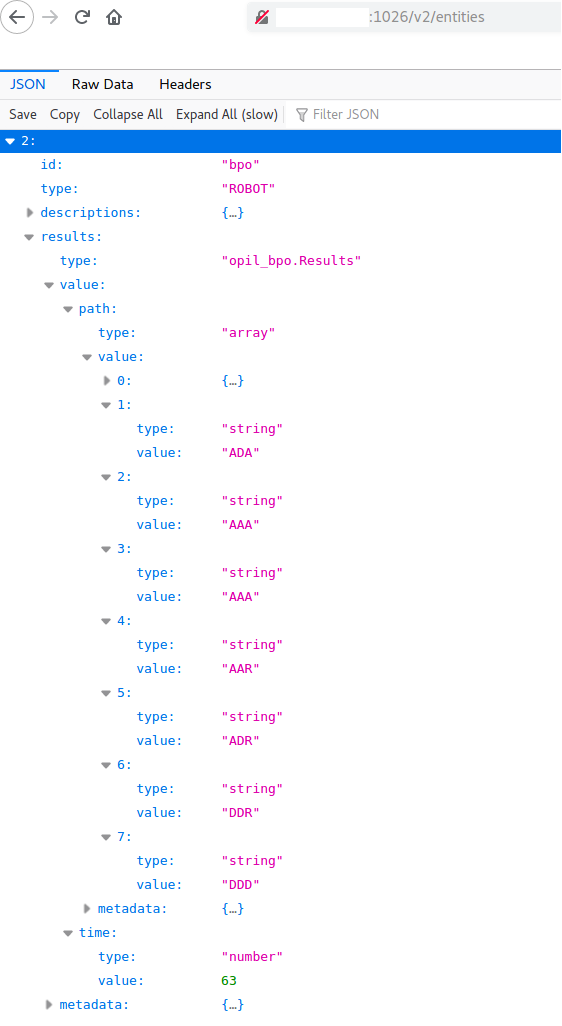
BPO results explanation
The BPO module seeks for the optimal solution for the given task "Transport item at location D". The BPO result consists of the shortest path and the time needed for the agents to complete the given task. The shortest path determines the less actions that should be performed by the agents (robot, human, item) to complete the given task. Time is the seconds needed to complete the given task. Following the task specification example, here is the path explanation.
The BPO output published on OCB as opil_bpo.Results entity has 2 attributes: 1. path, 2. time.
Following the given task specification example, the path will have 7 steps:
FDA, ADA, AAA, AAR, ADR, DDR, DDD
Each step is a string composed by letter as many as the agents are. At the moment, each string has 3 letters, one for each agent. The first letter refers to the robot, the second letter refers to the human and the third letter refers to the item. So, user is aware about the current position of the agents at any time during the task execution. Only one change per agent is allowed in every step for the robust control of the process.
- Step 1: The starting point of the agents.
- Step 2: Robot is moving first from F to A.
- Step 3: Robot reached location A. Now, human is moving from D to A. All the agents are at location A where the item is stored.
- Step 4: Human loads the item on the robot at location A.
- Step 5: Human goes from A to location D.
- Step 6: Robot goes from A to D carrying the item.
- Step 7: Human unloads the item from the robot at location D.
time is the seconds needed for the agents to perform the actions described in the steps above. In this example, time is 63 seconds.